This is a guide on how to do multi-map layering on rnmapbox. Includes working examples of layering two maps.
This is a generic overlay template component for @rnmapbox/map.
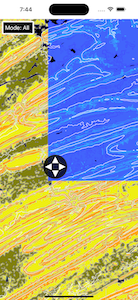
- You want to make a slide map.
- one of the layers is a transparency showing the base map + additional layer.
- When sliding you want both maps to be synced.
- You want the maps to be synced in position.
- You want to do absolute positioned maps and synced them. This guide will review limitations.
The following example is inspired by designs and approaches taken while creating the App A Deeper Map.
Building a slide map has some complexities especially with react-native. So this guide aims to show a clear path forward for doing overlays with Maps and other GL layers.
This guide could be used for any react-native component layering.
- How many full map layers do you need.
- If you have more than 1 slide map, how many sections of the map are potentially visible.
- Are you sliding or creating a pinhole effect
The solution below is only meant for 2 maps but likely could scale up to 4 maps.
Past 2 maps there could be severe performance issues with both network and device GPU resources since these maps are still rendered but not fully in view.
If you need to do this...you'll want to work with mapbox team and see if there is a way to inject a layer and clip it within the map component.
ReactNative similar to the web has an overflow property.
const absStyleNoLeft = { position: 'absolute', width: 500, height: 500, bottom: 0, right: 0, top: 0 }

const BackgroundBlueView: FC = () => {
  return <View style={[absStyleNoLeft, { backgroundColor: 'blue' }]} />
}

const ClippedOrangeView: FC = () => {
  return <View style={[absStyleNoLeft, { left: 250, overflow: 'hidden', backgroundColor: 'orange' }]} />
}

const Component = () => {
  return (
    <View style={{ position: 'relative', width: 500, height: 500 }}>
      <ClippedOrangeView />
      <BackgroundBlueView />
    </View>
  )
}
In the example above. There are two views. The BackgroundBlueView and the ClippedOrangeView.
- BackgroundBlue view will expand to fit the entire container because it has right, top, bottom values to stretch to these sizes.
- Similarly
ClippedOrangeViewwill expand. But the left side is constrained to 250 meaning the center of the view. Even though the ClippedView is still 500px it will only show 250px of this view.
To div deeper into what is going on. It's worth adding different colors to see what is being lost.
...
const borderDebuggingStyle = { borderLeftColor: 'purple', borderLeftWidth: 50}
  <ClippedOrangeView style={[...otherStyles, boarderDebuggingStyle]} />
The above example would render a purple border make it easy to see if the orange box is in alignment or if it the overflow is pushing off screen elsewhere.
On the same object that utilizes overflow: hidden add the prop collapsable={false} which will prevent the View from deflating in size. In some cases, this will help prevent the map from decreasing size when it is clipped.
Next step is to absolutely position two <MapView /> components. To make this simpler, consider adding two maps with different data but the same location to properly confirm alignment is working.
- The map view that is being clipped needs to be on a level higher than the map that will show underneath it.
- The clipped map should be styled to fit the container IE if it's the current container use
const {width, height }= useWindowDimensions()or if it's a smaller container use a position relative to allow absolute styling only within that container.
const {width, height }= useWindowDimensions()
 <View style={{ ...StyleSheet.absoluteFillObject}}><MapView /></View>
 <View style={{ ...StyleSheet.absoluteFillObject, overflow: 'hidden', width, height }}><MapView /></View>
The width and height are required for the container that must be constrained in order to retain the view's size. Without a set width or height, flex and absolute positioning will resizing the window to match the left, top, right, bottom bounds instead of overflowing.
When the focused map camera updates, all the unfocused maps would have to update to sync to that position.
Add something like useMapSync to synchronize everything without calling setState after a frequent interaction which is not performant.
Add sharedValues for the maps
Final step is to add gestures and fire updates to SharedValues
const panGesture = Gesture.Pan()
  .onStart(() => {
    sharedPressValue.value = true
  })
  .onUpdate((event) => {
    sharedPressValue.value = true
    if (slideMode === SlideMode.All) {
      sharedMapClipYValue.value += event.y
    }
    sharedMapClipXValue.value -= event.x
  })
  .onEnd((event) => {
    sharedPressValue.value = false
    if (slideMode === SlideMode.All) {
      sharedMapClipYValue.value += event.y
    }
    sharedMapClipXValue.value -= event.x
  })

return (
  <GestureDetector gesture={panGesture}>
    <Button />
  </GestureDetector>
)
Wrap a button, corner, or part of the screen you want to intercept interactions with a GestureDetector and a PanGesture handler.
A button is recommend for semantically showing the user that they can resize a window.
Aside: Did you know that
<Pressables>and other interactibles can fire and set animations to show interactions if they use animated styles?
After creating this button we can now determine how we want to compute the pan events.
- To make things less jarring consider an incremental addition or subtraction of the animatedValue using the delta value
state.xorstate.y. - Keep the pressed button indicator active when dragging.
- Try doing pinch gestures with two maps selected. Notice how this does not work.
- Workarounds could require intercepting a pinch and manually firing the zoom affect if the pinch is executed but the pinch action crosses the map boundaries.
- Try adding the library react-native-view-shot. Notice that only the first underlayer map is captured for android. This is likely a GL issue potentially with overflow not being respected.
- Workarounds include directly firing image capture tool on both maps, then rendering Images instead of the Map Components for the clipped view and finally firing a snapshot on these views.
- Alternatives could be stitching the two images together but clipping / masking them at the overlay spots.
- Accessibility
- touch specific elements are not except from accessibility, provide an alternative way to interact with the app so that everyone can use it.
- Voice commands to slide the map
- Buttons to press to slide in increments etc.
- See docs here and maybe react-native-slider for inspiration.
- touch specific elements are not except from accessibility, provide an alternative way to interact with the app so that everyone can use it.
- This could be taken a couple steps further by creating different clips/masks of maps using circles and potentially polygons with
react-native-svgto act as view masks which would embed the map within their clipped hierarchies.
- Add a way to render two different maps within a single map client.
- Would eliminate the touch interception issues with two maps being interacted with.
- Would be more performant as two maps being rendered together takes more battery especially if rendering duplicate symbols.
- @rnmapbox/map
- react-native-reanimated - For all things related to animations. You will need this to create performant animations that clip the map views.
- react-native-gesture-handler for gesture interception
This repo contains the full example. Please follow the @vllc/mapbox README.md and the monorepo README.md for installation